Augmented reality is considered an extension of virtual reality. Virtual reality (VR) is a virtual space in which players immerse themselves into that space and exceed the bounds of physical reality.
 |
| Pranav Mistry's Sixth Sense Technology |
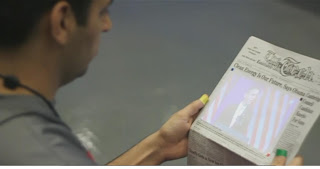
Now that you know what we are talking about let's start making something. Today i am going to show you how you can embed a video to a marker more like how Pranav Mistry does while watching a video of Obama's speech in MIT on a newspaper. See his Ted Talks demonstration of SixthSense Technology.
Prerequisites:
4. Webcam
5. Pocket Projector (Optional)
6. Windows or Mac OS
Step 1:
Download all the necessary software mentioned above and create a new folder either in C drive or D drive. Name it as "Actionscript". Now in this folder add folders "org" and "com" which you will find in FLARManager v06 folder. Also add the folders "papervision3D" and "ascollada" (which you will find in Papervision3D 2.0.883 folder) in the "org" folder under "Actionscript" directory.
Step 2:
Open Adobe Flash Builder 4.6
File > New > Actionscript Project
 |
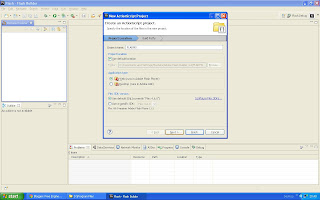
| Figure 1 |
Project name : FLARMS ( You can Put any name you like )
Click on "Next" leaving all other settings as shown in Figure1.
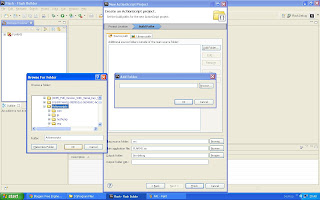
Now click on "Source path" tab just adjacent to "Library path" then Add Folder and select your global "Actionscript" Directory that we just set up in Step 1. See Figure 2
 |
| Figure 2 |
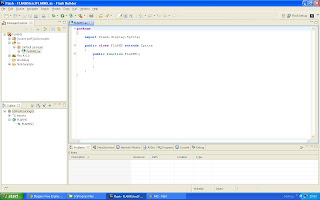
After loading the Actionscript directory click on finish and the project should load all the files in the package explorer window and the FLARMS.as file should show up. See Figure 3
 |
| Figure 3 |
Step 3:
Use the Code From The Source Code File Provided In The End.
Now Import The FLARManager v06 project into your package explorer
File > Import Flash Builder Project > Project Folder > Browse > FLARManager v06 > Finish
FLARManager v06 > resources > flar
Copy "FLARCameraParams.dat" and "flarConfig.xml" file and paste it in "src" of FLARMS.
Download any m4v video and paste it into "src" of FLARMS.
( This is the video that you would watch on the marker )
Now open the "flarConfig.xml" in "src" of FLARMS folder and edit it to match the following code:
<!-- this file specifies configurations for FLARManager. -->
<!-- to use this file to initialize FLARManager, pass its path into FLARManager.initFromFile(). -->
<!-- note that all relative paths listed here must be relative to the .swf location; absolute paths may also be used. -->
<flar_config>
<!-- source settings -->
<flarSourceSettings
sourceWidth="320"
sourceHeight="240"
displayWidth="640"
displayHeight="480"
framerate="30"
downsampleRatio="1" />
<!-- miscellaneous FLARManager settings -->
<flarManagerSettings
mirrorDisplay="true"
smoothing="3">
<smoother className="FLARMatrixSmoother_Average" />
<thresholdAdapter className="DrunkWalkThresholdAdapter" speed="0.3" bias="-0.1" />
</flarManagerSettings>
<!-- location of camera parameters file, e.g. FLARCameraParams.dat or camera_para.dat. -->
<cameraParamsFile path="FLARCameraParams.dat" />
<!-- list of file paths of patterns for FLARToolkit to detect. -->
<!-- @resolution specifies the resolution at which the patterns were generated. -->
<patterns resolution="8" patternToBorderRatio="0.5" minConfidence="0.5">
<pattern path="a.pat" />
</patterns>
</flar_config>
Now Save the File and Download this File : "Vid.swc"
(Google it).
Paste it in "src" folder of FLARMS project folder in package explorer. Save everything.
Step 4:
Download This : http://flash.tarotaro.org/blog/2008/12/14/artoolkit-marker-generator-online-released/
Install The ARToolkit Marker generator and run it.
Hold up a pattern in front of the webcam and let the marker generator detect the image and you can see red lines drawn around your pattern. Click on Save Pattern and rename the file as "a.pat"
Copy this file and paste it in "src" folder of FLARMS project folder in package explorer.
(Copy this image and use it as your pattern image. Print it out on a white page and use it as your marker.)
Done. Just Debug the Project and You get A Flash Window Prompting Access To Your Webcam,
Allow it.
Hold up your pattern in front of camera and whoa! you'll see the video playing on the marker as if its out of the PC.
Download the Source Code here : http://www.gotoandlearn.com/files/fm.zip
 |
| Pranav Mistry Watching A Video On A Newspaper |
If you use a projector you can do the exact same thing as displayed in this picture above.


